Image
![]()
Now available as a fully searchable PDF collection – the Linear Audio USB stick!
See this page for details and ordering info.
At this point, I have no more autorangers available.. There are no plans for another batch.
Stop press: at this point I have to halt shipping of autorangers because I can't get the LTC1968 RMS-DC converter. I have a batch coming in end February 2022 so you can order an autoranger if you wish.
The AutoRanger uses a multi-color LCD display from Newhaven: NHD-0216K1Z-NS(RGB)-FBW-REV1, available from Mouser and others. However, as it doesn't have a CE marking, distibutors will not ship to consumers in the EU. This is a real pain, and I have ordered some for my own stock and will include one in the half-kit when requested, at-cost (€ 15). The half-kit price will then be € 95 without the SilentSwitcher. Hope that this will take away some of your sourcing blues for EU users.
Also, for those of you who don't like to construct the flatcable assembly, these are avaiable from both Digikey and Mouser, part number ISDCB84, manufacturer NKK. Around $ 9.
Dear friends, many of you have in the past expressed interest in my autoranger, which has been sold out for some time. I am happy to say that I have more cases and PCBs available, everything that is listed below except for the SilentSwitcher supply. However, SilentSwitchers are available from the diyaudio store, and the price has been cut by $ 10!
lettered, painted, punched and studded enclosure;
programmed controller;
Multi-color LCD display;
attenuator PCB with the LT1968 presoldered;
display/control PCB;
a fully assembled silentswitcher power supply is available separate from the diyaudio store.
Price is € 95 with display, or € 80 without display, + shipping, without the SilentSwitcher.
A Youtube from Toni Budau going through the assembly of the display/controller board and the attenuator board is here.
After an intense final run together with Matthias Carstens, I now present the ARII V3.19 rel-2. Upgraded software funcionality with more nominal output level selections, an even lower SN ratio and lower THD. Matthias has compiled a sort of test program which gives a very good overview of the performance and use cases for the AR. The concept is still the same: the partial kit has the painted, lettered and cut case, both PCBs, the programmed controller, the pre-soldered RMS-to-DC converter and the SilentSwitcher power supply. The following files are for assembling and using the AR and the BOM for the attenuator board (choice of 10k or 20k input impedance).
Note: this final version does NOT require adjustment or calibration!
ARII V3.19 rel-2 assembly guide ARII V3.19 rel-2 user guide
ARII V3.19 rel-2 BOM (Zin = 10k) ARII V3.19 rel-2 BOM (Zin = 20k)
ARII V3.19 rel-2 Display/Control board Bill of Materials
Update 9 August 2020 - It seems that the RMS-to-DC converter chip, the AD536, gets more and more hard to find and more expensive.
Digikey wants $ 20 for one. So I will redesign the attenuator board for a current RMS-to-DC converter (which will most probably be SMD anyway). But that will take me some time and to accomodate the current situation I will include an AD536 for free in any kits ordered from today. Saves you up to $ 20.
Update 28 May 2020 - Another builder documents his AutoRanger adventure: The Archimagio Blogspot, no less! And our friend Giuseppe Parolo from Italy took the trouble to translate the User Guide and Assembly Guide into Italian - thank you Guiseppe!
Update- 2 April 2020 - AudioXpress tests the Autoranger MKII!
Update- 1 April 2020 - version with more level selections.
Pricing: the half kit is (the equivalent of) € 149 + shipping. If you want a completely build, tested and calibrated unit, you have to order the kit from me but you don't pay shipping. I will forward your kit to my friend Ward Maas at Pilgham Audio in The Netherlands, and they will charge shipping at cost later. Assembly, testing and calibration will be € 150 which you will need to pay to Pilgham but this does not includes parts on the User BOM. If you want Ward to order all parts for you that would be € 140.
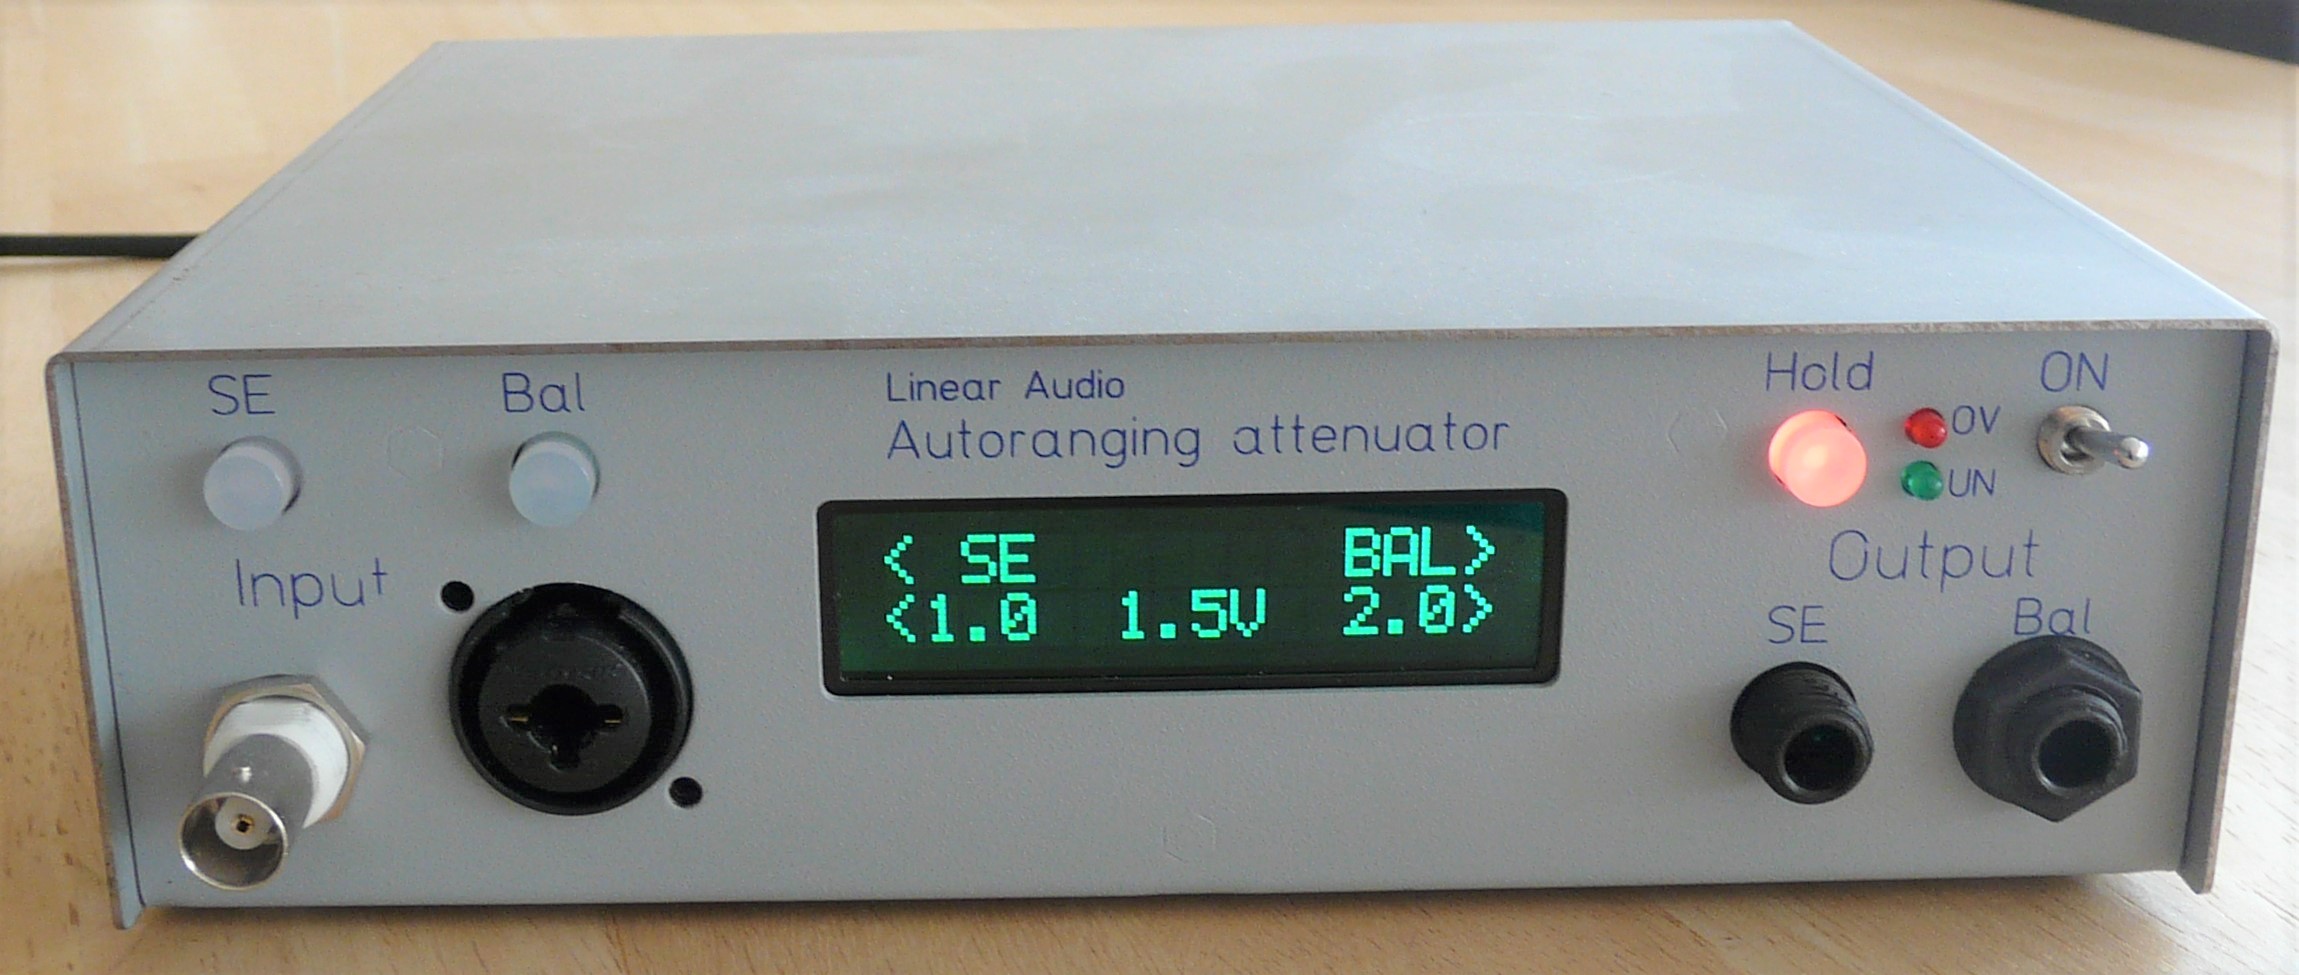 Several people have asked repeatedly for different nominal values than just 0.4V and 1.0V. I have updated the software to make it possible to select a value between 0.5V and 3.0V in 0.5V steps. (3.0V is the max the existing hardware can handle). The procedure is similar to selecting one of the values in the current software: switch on the AR while keeping the Hold button pressed. For the new software (ARII-2-sel) you now get a menu, preset to 1.5V out of the box. Using the SE and Bal buttons you can step through the menu to select the value you want. Attached is a representative picture (I'm not a photographer as you can see ...). It shows the value set when you switch on with Hold depressed the very first time (1.5V). Selections are kept when you switch off, until you set them to a new value. For those of you who want the new version, I can send a new chip for € 10 including flat shipping.
Some of you who work mainly with tube equipment have asked for a version with a higher input impedance than the 10k for the stock MK II. Input impedance is a compromise between complexity of the attenuator and the frequency response as was the case with the 100k Rin of the initial version. That 100k required quite a complex calibration for flat frequency response. The 10k MK II in contrast doesn't need any calibration and is flat to over 1MHz. But listening to you, I build up a unit with 20k input impedance, and tested it. I am happy to report that it has a flat frequency response out to over 600kHz in all settings, without any calibration.
The 20k input impedance version requires some different values for the attenuator resistors. To my surprise, it all fell so nicely together with existing E96 values that 8 less resistors are required, 2 positions on the board have to be shorted and 6 can be left open! Here is the BOM fragment for the 20K Rin variant. All other part values and designations remain the same.
Linear Audio AR MK II Attenuation board Bill Of Materials variant for 20k Rin version only!
 Two years after the successful introduction of my Autoranger it is time for an New & Improved version ;-) . Meet Autoranger MK II. I have redesigned completely the attenuation and switching board. Distortion and noise have been lowered, and the manual use is more intuitive. There are some small changes in the attenuation and gain steps, which now range from -42dB to +18dB in 6dB steps. The choice of nominal output levels going to your soundcard also remains either 1V or 0.4V. Both single ended and balanced inputs as well as simultaneous single ended and balanced outputs have been maintained. Some of the improvements are the result of lowering the input impedance from 100k to 10k. Every piece of audio equipment I know can drive 10k. The control and display board as well as the enclosure are unchanged from the original unit. Power is provided, as it was before, by a SilentSwitcher mounted on the back of the enclosure. A SS will also be part of the kit.
What has been deleted is the need for accuracy- and level-calibration. That was a bit of a nuisance as you needed some pretty accurate equipment for that. The new AR MKII is calibrated out of the box and the only adjustment needed is the Common Mode Rejection which can be done using a simple AC multimeter.
Another piece of good news is that I decided to go away from a pre-assembled SMD board to a bare board with 99% through hole components. This lowers the cost of the kit. Of course, you still need to get the parts you don't have, but it should still be lower cost overall.
What's in the 'quarter kit'? This is a diy project, where the kit provides you with the specific parts that you can't normally get. You have to get the regular parts and the two Bill of Material links below give you not only part designations but in most cases also the Mouser part numbers. You can upload this list to Mouser for a one-stop order. The kit consisits of the following items: painted and lettered steel enclosure, attenuator/gain switching PCB, display and control PCB, programmed microcontroller with DIP socket, and a completely assembled SilentSwitcher which fits the rear panel cutouts in the enclosure.
I will be able to ship kits starting 29 July. Those who have indicated interest will get an email before that, asking if they still want one. If you want one, just send me an email (see 'Contact')
The following links will let you download all User Documentation necessary to build and use one:
Linear Audio AR MK II Assembly Guide updated July 28, 2019
Linear Audio AR MK II User Guide
Linear Audio AR MK II Attenuation board Bill Of Materials updated LED order #, July 30, 2019. Update ceramic cap 1uF, August 18, 2019. Update 1 Sep resistor replacement.
Linear Audio AR MK II Display/Control board Bill of Materials
Attenuator Board Stuffing Guide Control/display board Stuffing Guide
After a lot of to-ing and fro-ing I decided that my soundcard needed a front end that would give even an Audio Precision credit! Well, that was easy. Now designing, building and testing it - that was far more work (and far more money!). But after more than a year, I am now at the stage that I have a fully functioning prototype, power supply, software and all.
A picture is worth a 1000 words - the Autoranger YouTube video
Update 15 Nov 2017 At the request of several users I compiled an overview of the control codes for the attenuation and gain settings.These can be tapped off for external use simply by extending the flat cable between the two boards.
Update 29 Oct 2017 updated the Data Package to r5, with BOM r3 and new Changelog doc
Change affects the value of C6, which should be 360pF instead of 510pF.
Update 15 Oct 2017 updated the Data Package to r4, with calibration procedure r2 and BOM r2. (replaced by r5 as of 29 Oct 2017)
All ordered and paid for units are send out, either directly to you or to Pilgham for assembly.
Ward is making good progress, and I will coordinate with him on the calibration. I did build up two units on the new boards from the manufacturer and it seems that some of the cap values for calibration need to be adjusted; my hunch is that the PCB material (and maybe the parts) from this new source is slightly different in parasitics. Note that this does only affect the adjustment range to get the calibration correct.
Capacitors C5 and C17 on the atten board (22pF) can be shorted or correct calibration (-48dB) but we are looking in recommending a new value that makes the adjustment a bit less sensitive. Capacitors C7 and C11 (22pF) on the atten board can be left out. Capacitors C6 and C10 (510pF) *may* need to be changed in value, will know in a few days.
Again, this is only related to the cal range of the adjustments to null out board and parts parasitics.
Update 28 September 2017
Update 18 September 2017
Finally we're getting there! This week will be busy as I am receiving the last PCBs and will have do do a lot of packing etc. I expect to ship next week.
I also arranged for someone here in Netherlands to assemble and calibrate units if anyone wants that. I will have the cost for that later after he assembles the first test case and I go with him through the cal procedure. This will be strictly between you and him without any (financial) involvement from me; I will just mail your unit to him and he takes it from there. I will give tech support of course when necessary.
Everyone who has signed up for this will get a message requesting info the next few days. Let's get the show on the road!
Update 4 September 2017
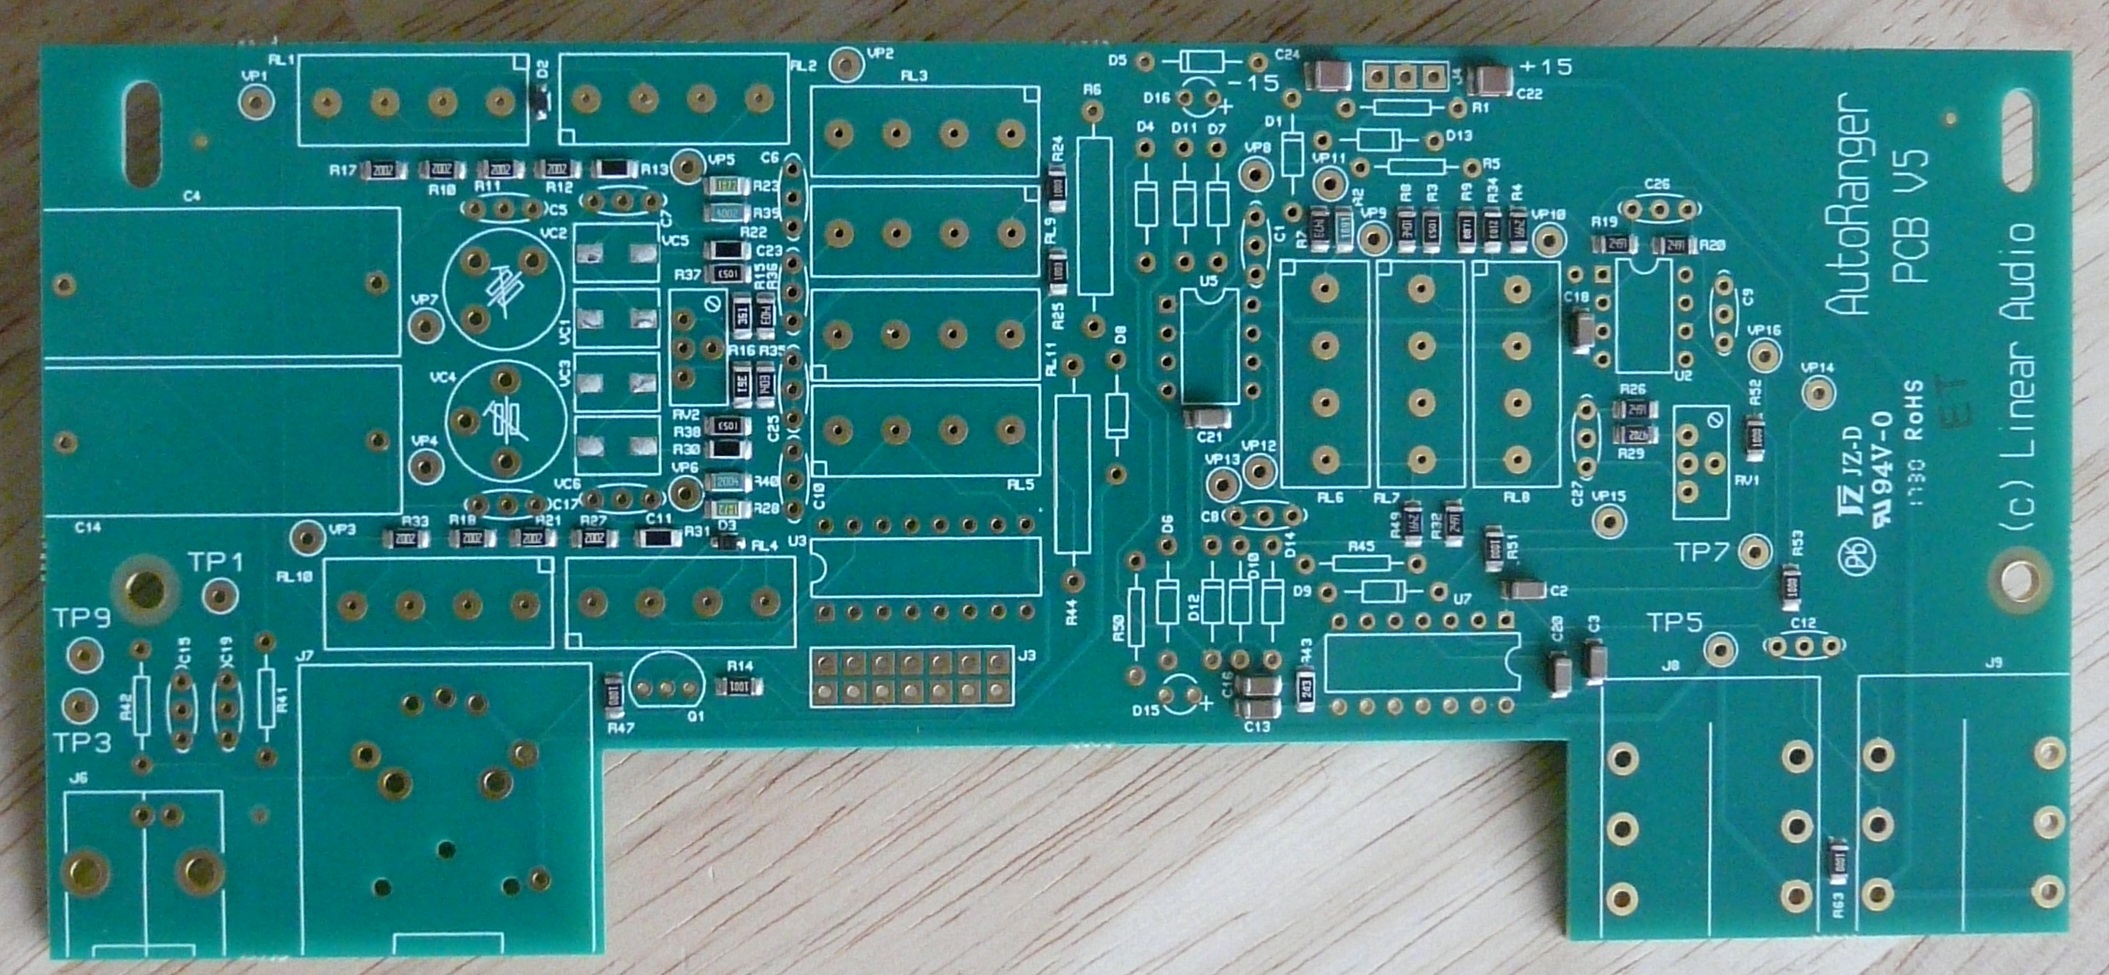
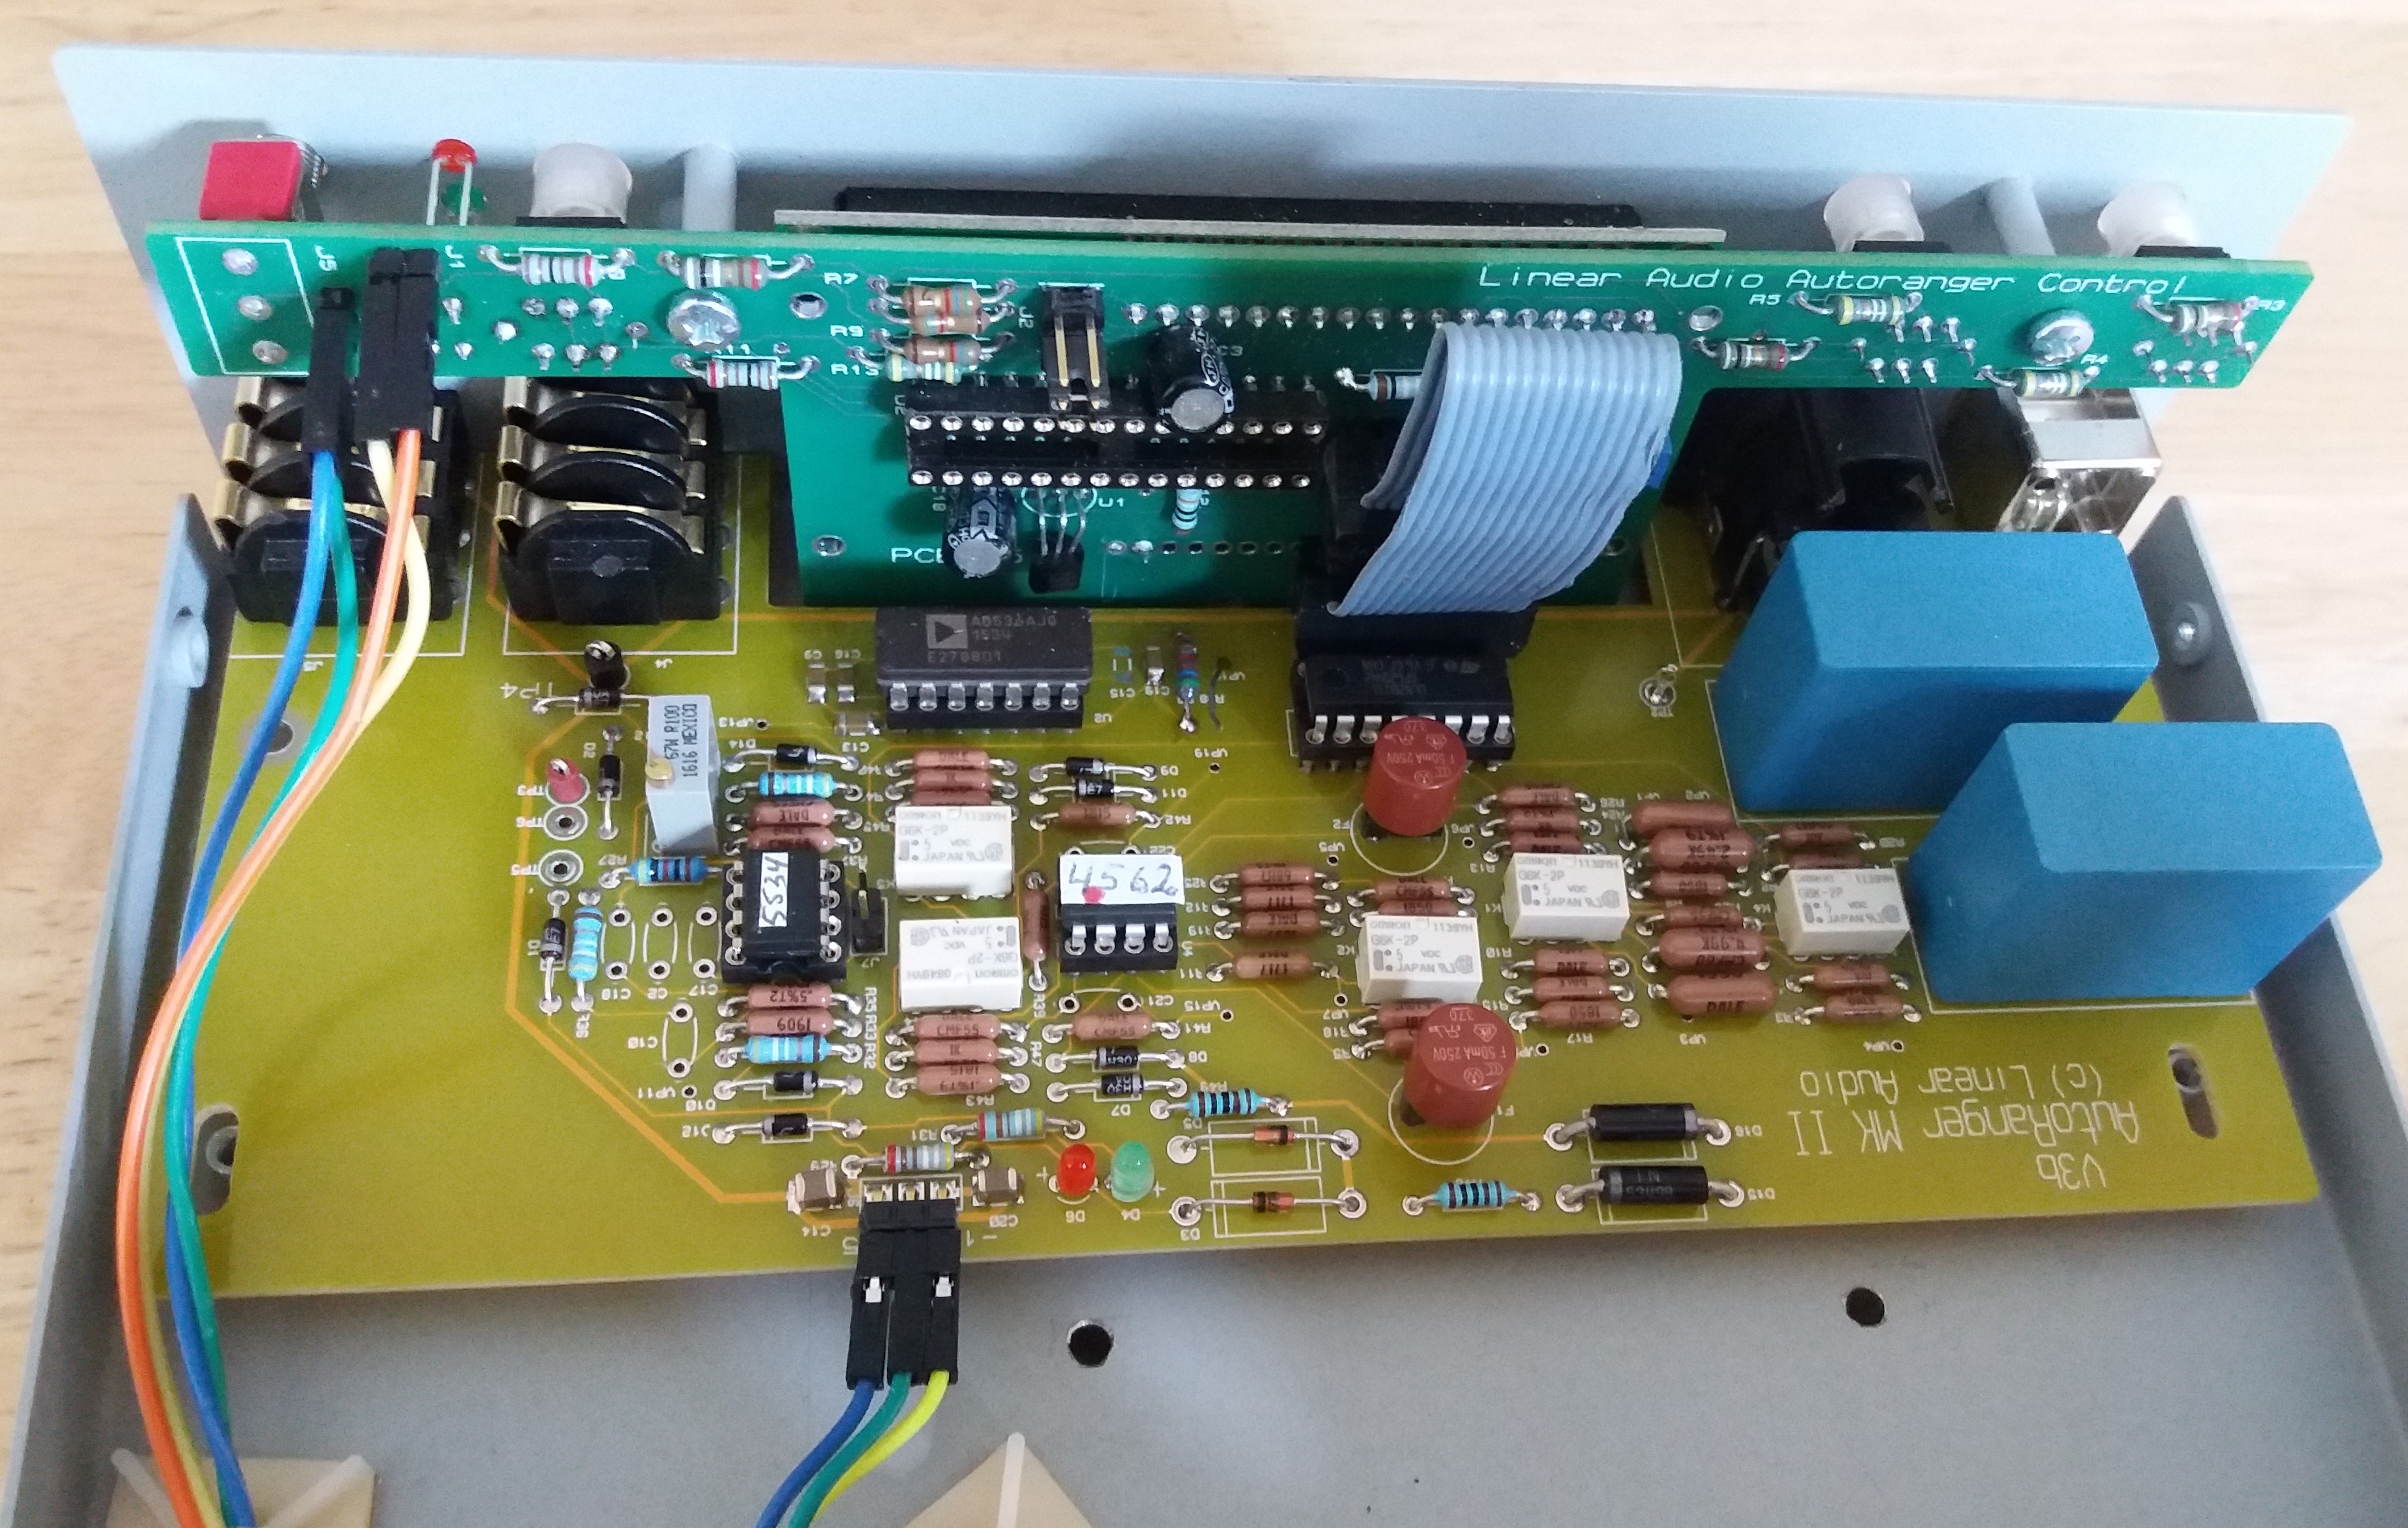
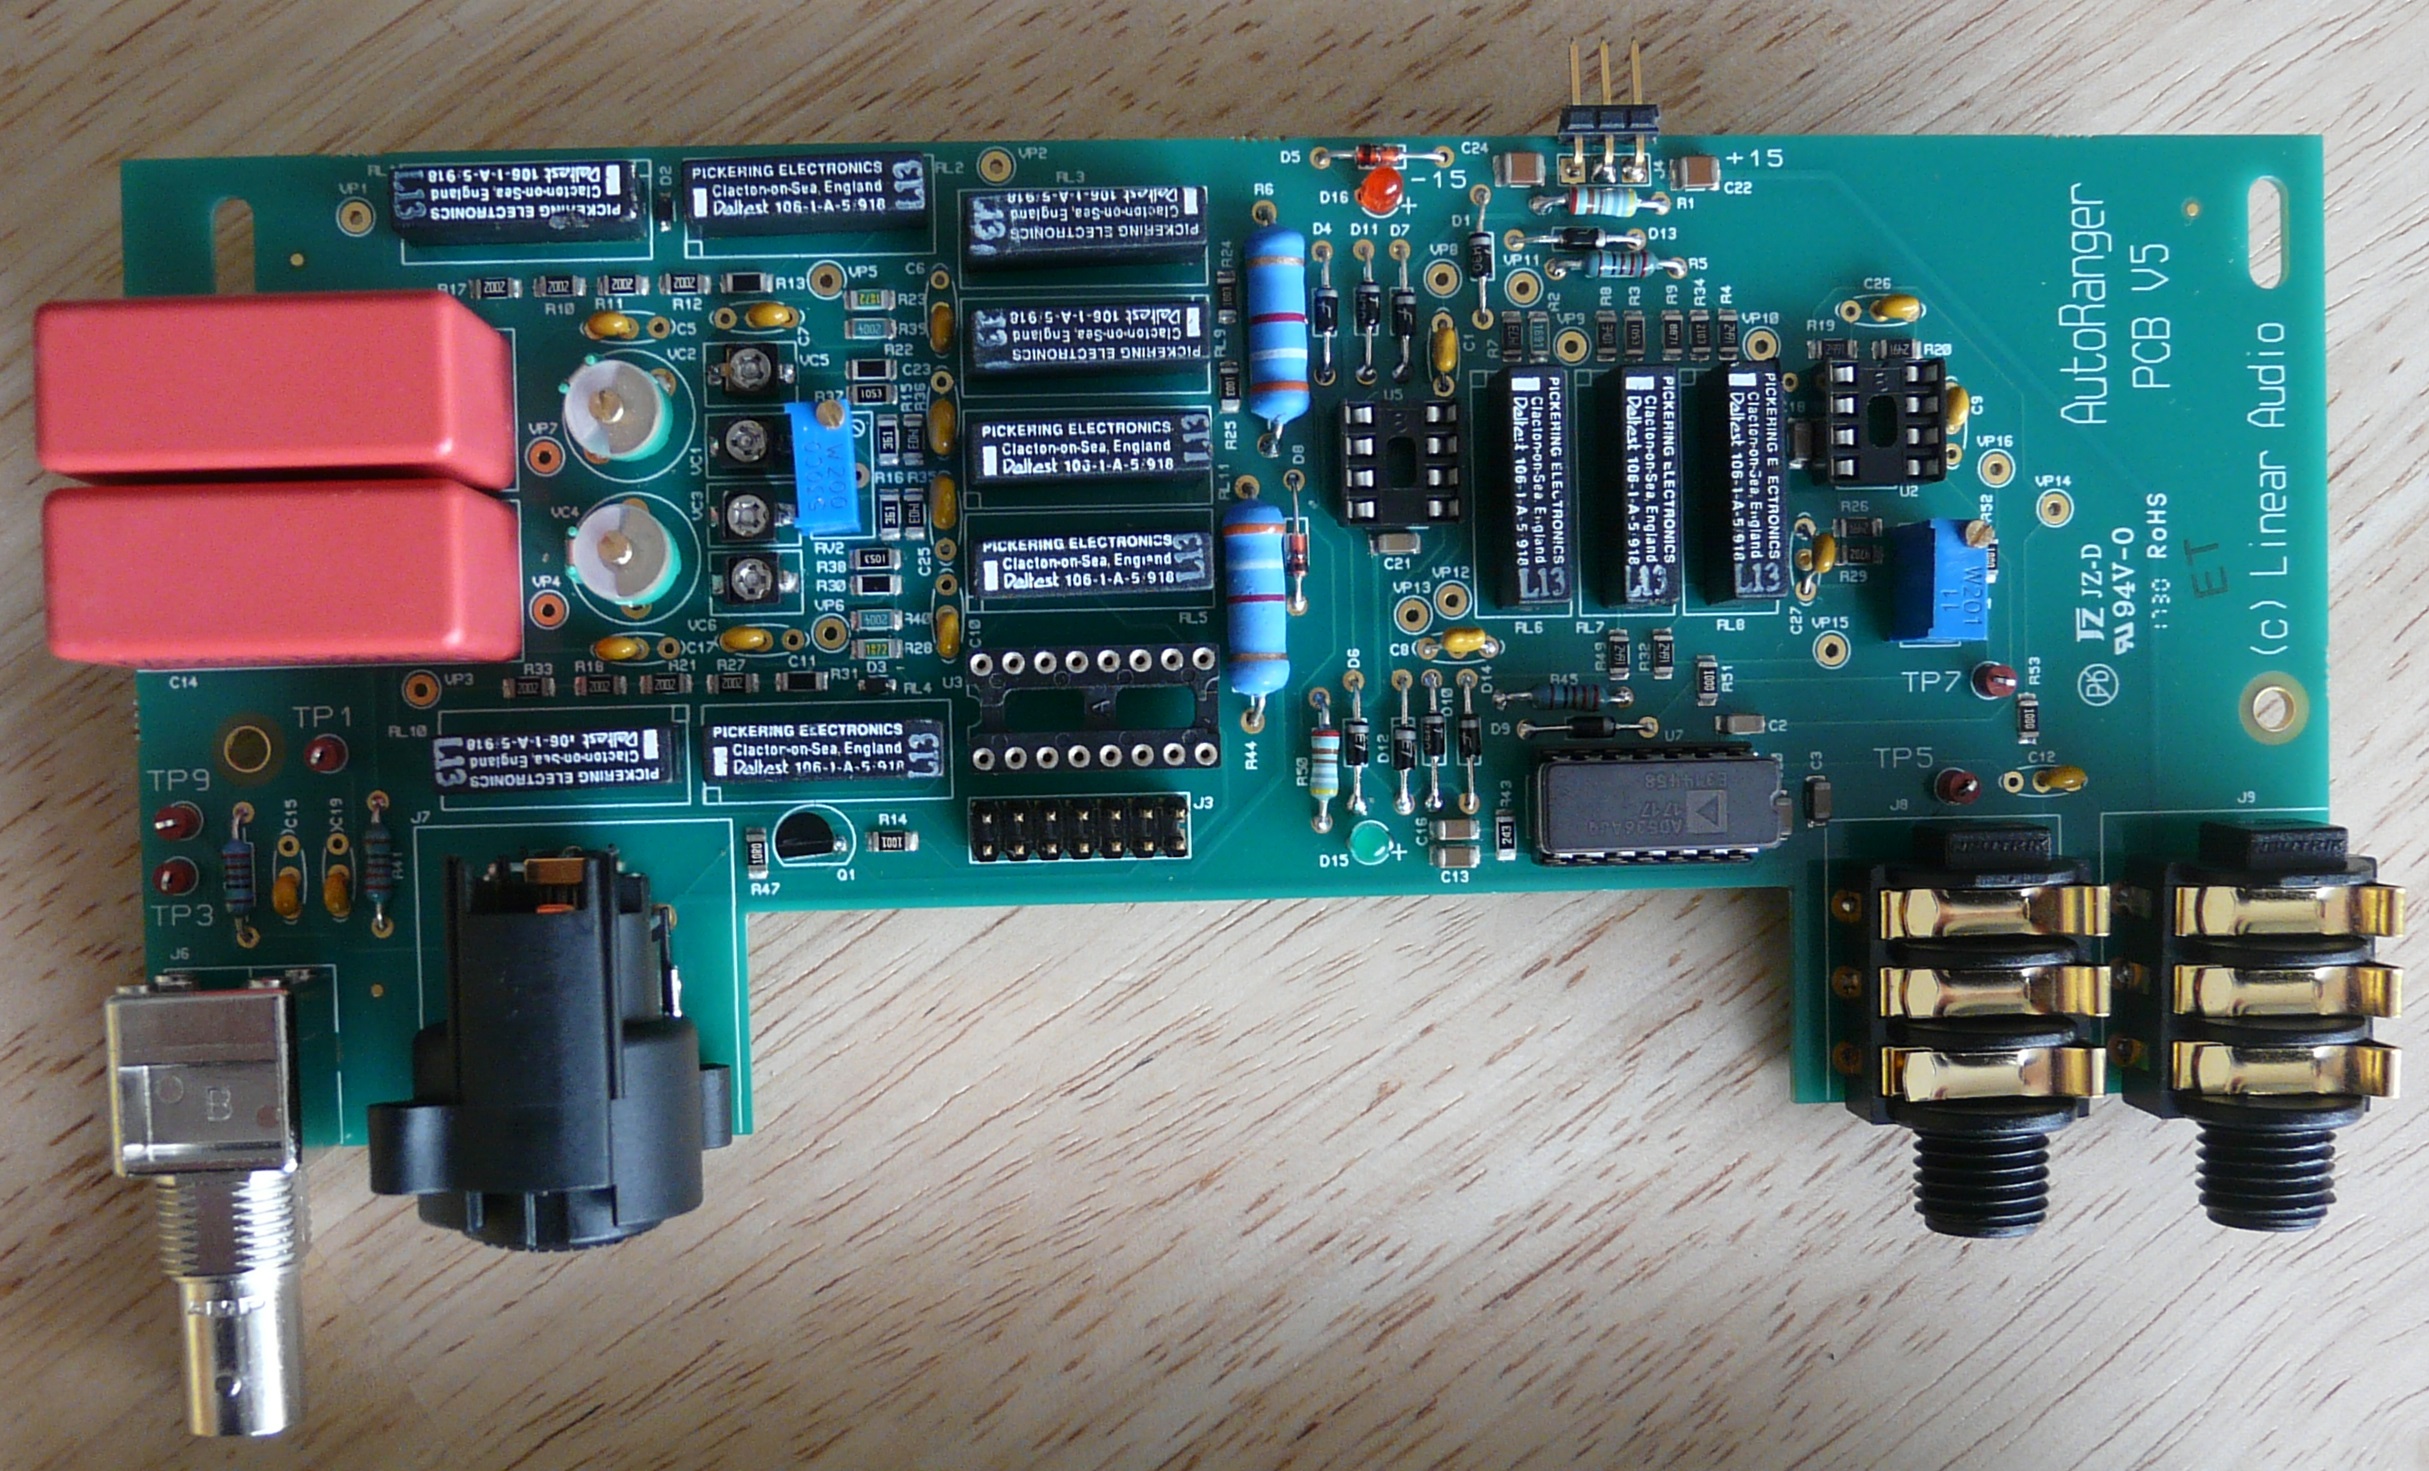
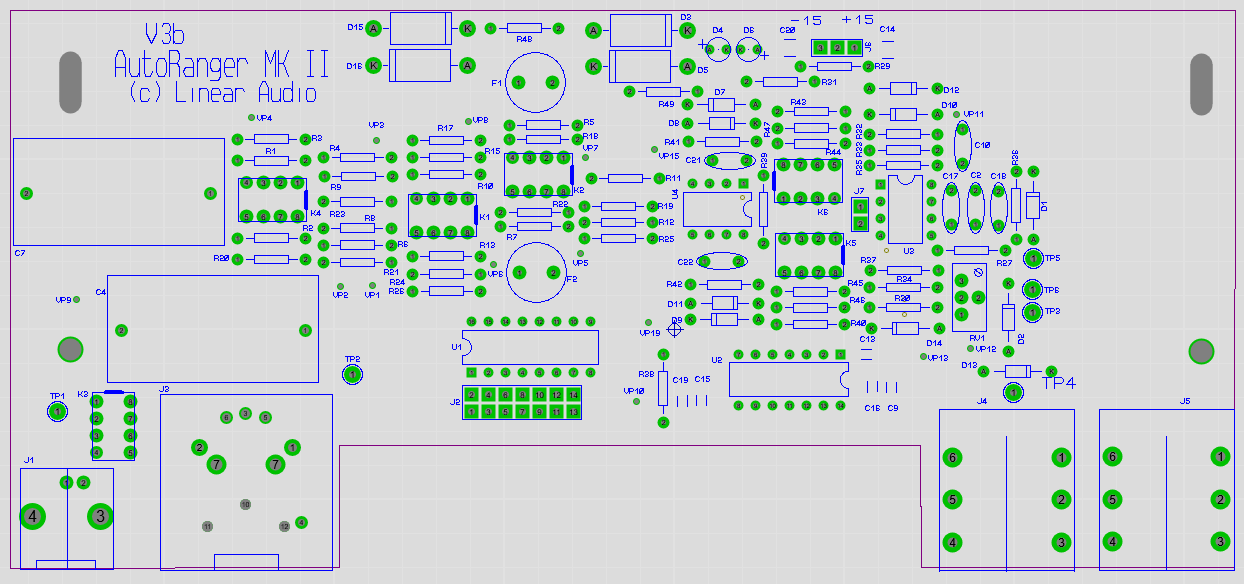
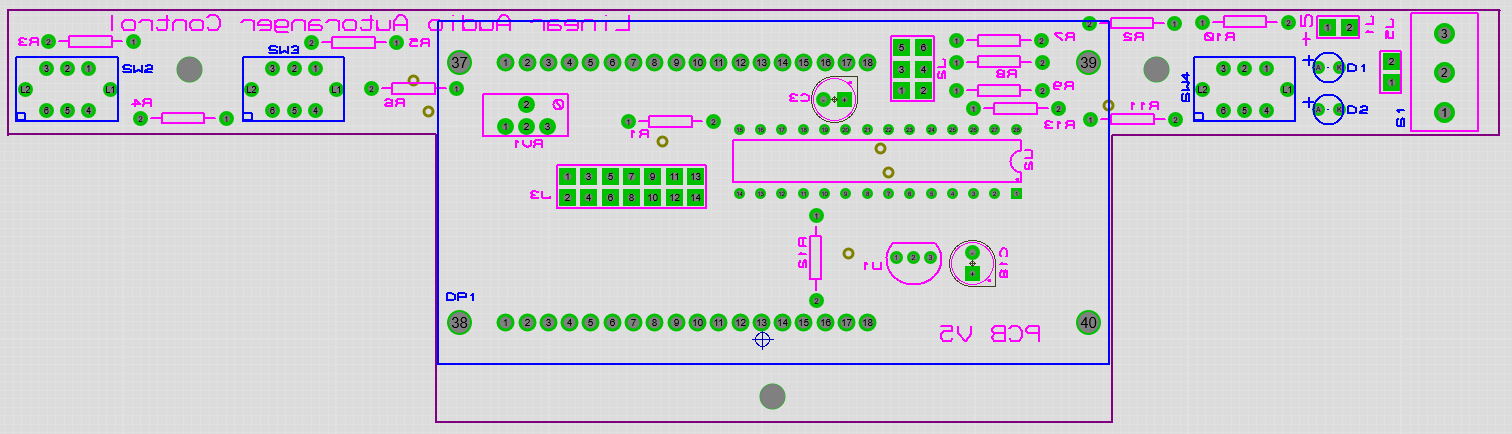
Today I got two pre-production attenuator boards with the precision attenuator SMD parts pre-mounted. Populated one fully, and switched it on. Just worked. Boring ;-)
See attached pictures. Now you know why I insist on pre-mounted SMD, fully tested by the factory.
Update 22 August
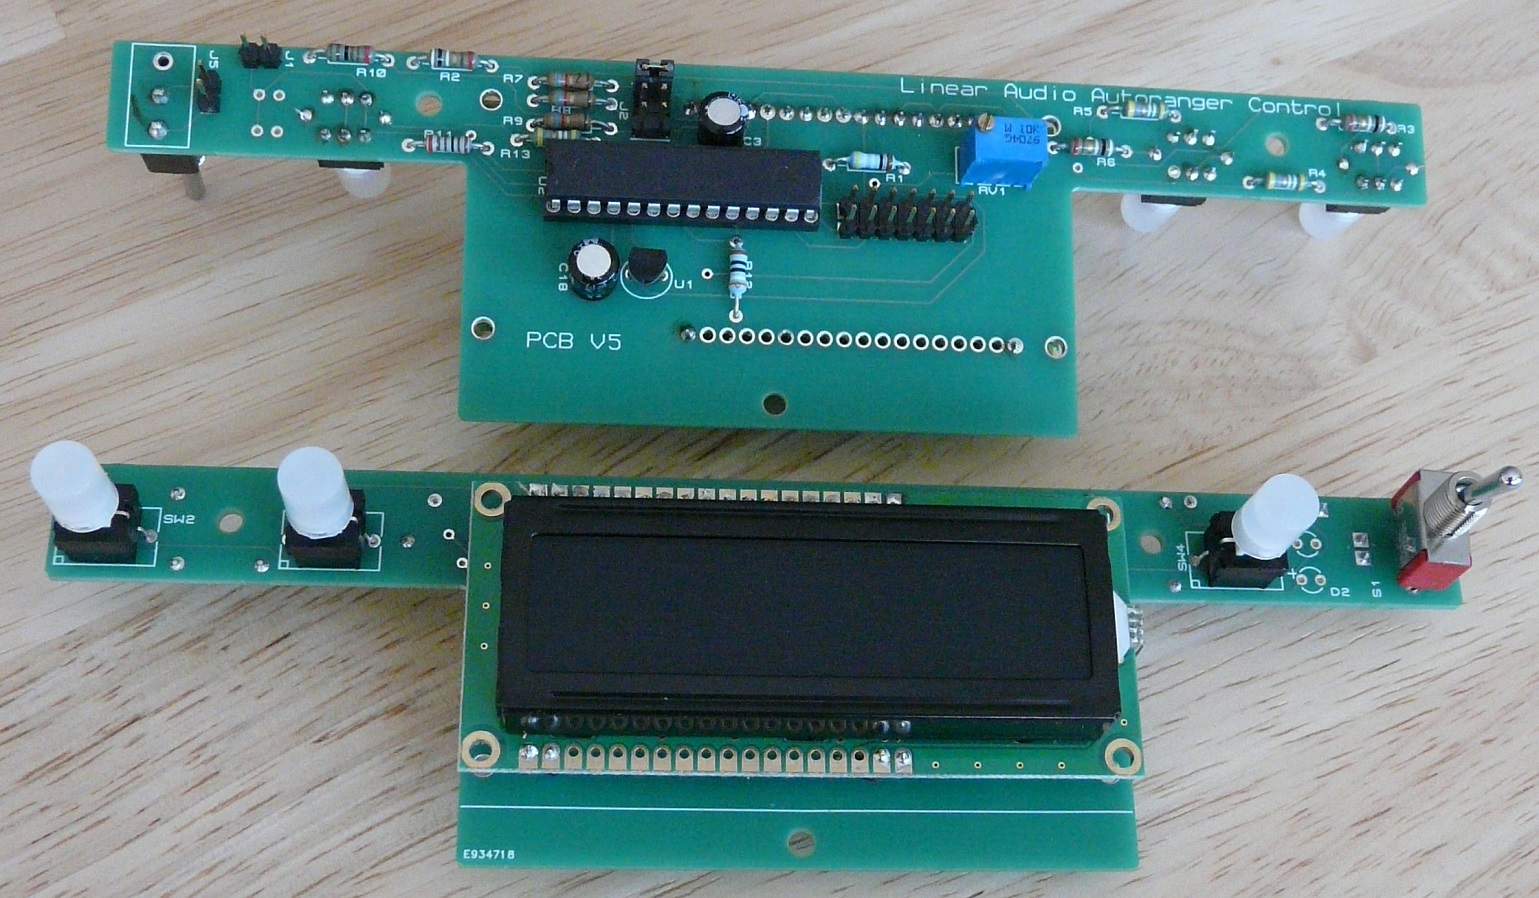
Assembled the first two propduction front-panel/control PCBs. Worked flawlessly at first switch-on ;-)
Update 11 August 2017
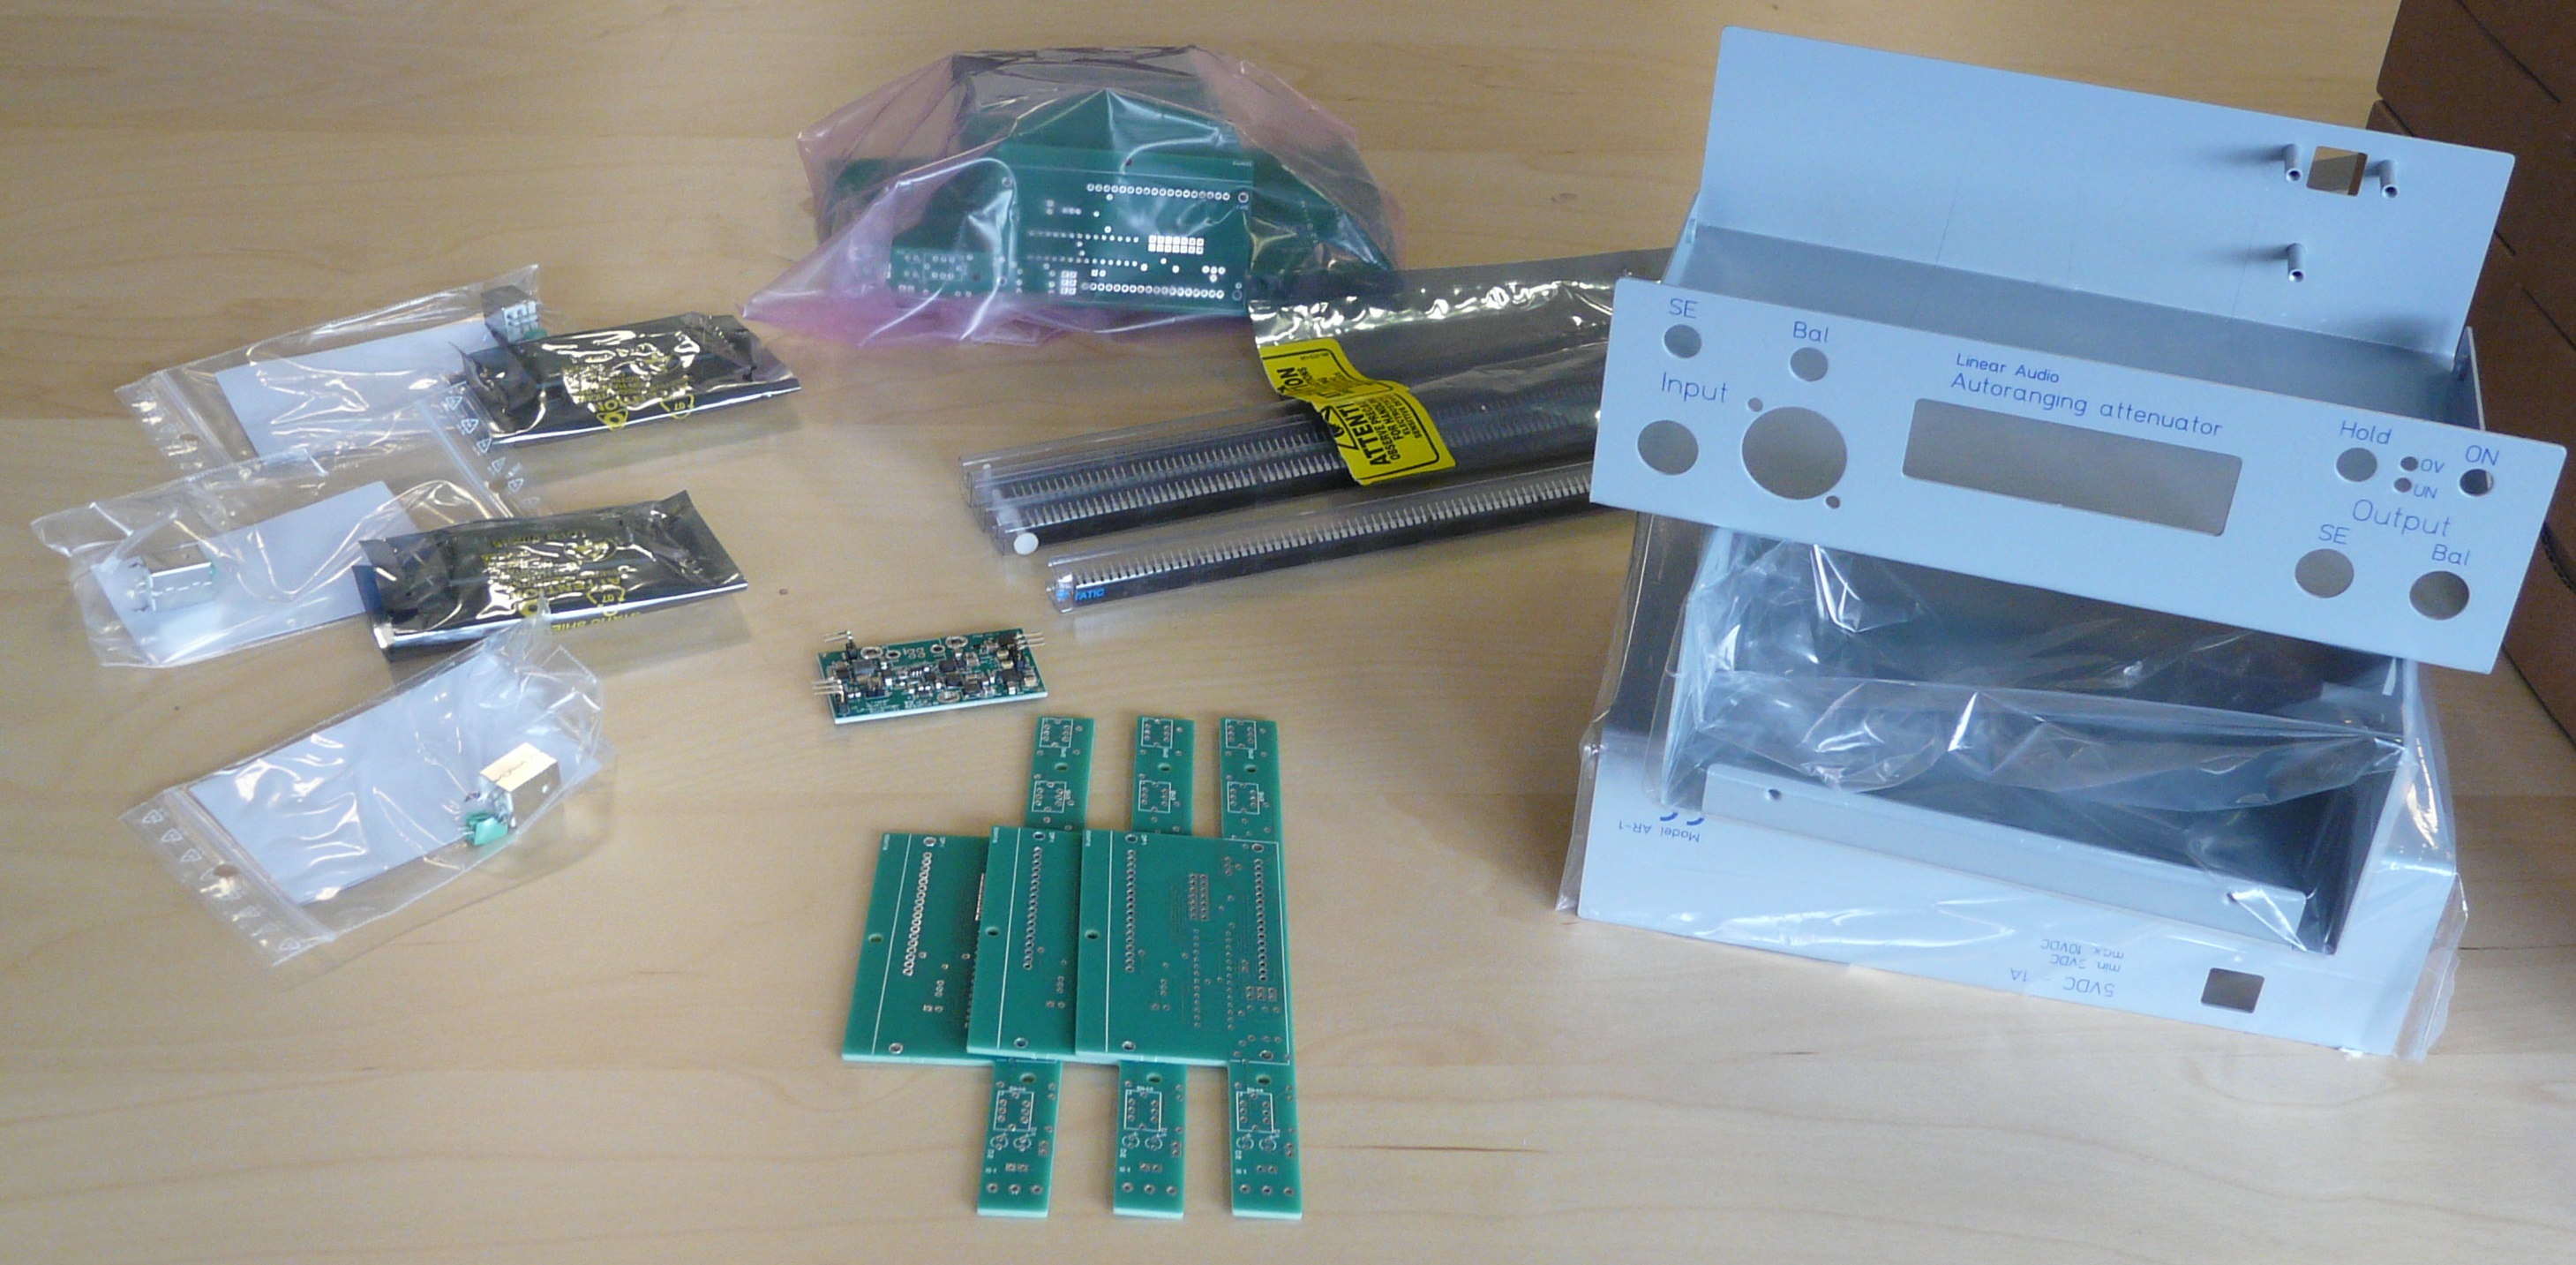 Parts and units for kits start to flow in. I have received: all cases, mounting hardware, all SilentSwitchers, the front panel PCBs, and the microcontrollers to be programmed. Awaiting the main attenuator boards with the pre-mounted precision components. We're getting there!
Update 21 July 2017
I have ordered the control & display PCB, and the attenuator PCB with the precision SMD components, expected to be delivered 1st week September. The SilentSwitcher supplies have been delivered, as well as the enclosures. We're getting there!
Update 5 July 2017
I have finished the design and am putting together the complete package. I will offer the unit as a half-kit, namely:
- the main PCB with all precision SMD parts for the attenuation chains pre-mounted;
- the bare control & display PCB (has only standard TH parts);
- the programmed microcontroller;
- a complete painted & lettered custom enclosure;
- a SilentSwitcher power supply module for powering from a USB-charger or mains-free from a Powerbank.
The price of this package is € 209. Shipping will be € 7 flat, tracked. To complete the unit, the through-hole parts need to be soldered to the two boards. These include the reed relays, the push-buttons, the LCD display, ultra-low leakage protection diodes, sockets for the opamps, the relay driver and the chips including the AD536, the voltage reference IC for the ADC, some assorted R's and C's. The complete unit needs to be assembled and some (limited) wire-up. A short 2*7 pin flatcable link needs to be fabricated to connect the two boards. Here are the BOMs for the through-hole parts that you would need to provide and solder to complete the unit. I have given Mouser or Digikey order codes, but you may have some of these parts already and/or get them cheaper. Just as a ballpark number, if you get them all from Mouser recon about € 100 total.
User BOM attenuator board User BOM display/control board
Physically it will look as shown in the Youtube video. There are some additional functions not mentioned in the video. There are now two front-panel selectable nominal output levels (1V and 0.4V). The attenuation range is increased to -48dB max. to allow max 100VRMS input from your power amp with the lowest nominal (0.4V) output level. Also, in manual operation you can select 0dB, -16dB, -32dB and -48dB attenuation from the front panel, in addition to the HOLD button freezing the attenuation at the present setting for amplitude sweeping.
All assembly guides, calibration procedures and parts lists will be available for download. I am now working on the Construction Guide.
I might also offer complete assembly but not sure yet what that would cost extra - manual labor hours are not cheap these days; I'm looking for someone who will do that at nominal cost for fun rather than as a down-payment to his Lexus ;-)
So, let me know at jandidden01@gmail.com if you are interested anyone; I am putting together a mailing list for the time when it is all completed.
Update June 2017
Finalised a firmware update which now allows you to switch between 1V and 0.4V nominal output level without opening the box. Instead of using a jumper it can now be selected from the front panel at switch-on. This will allow it´s optimal use both with soundcards that are most linear at 400mV Vin, and others that work best at around 1V Vin.
That also required making the level calibration separate for the two nominal level settings, saving the level cal settings between sessions. Also, if you do only one calibration (for either the 1V or the 0.4V setting) the other is estimated (until you do a real cal for that).
The introduction of the 0.4V nominal output setting option required increasing the max attenuation to -48dB to maintain the max 100VRMS input level (from the original -40dB). Manual settings on the front panel are now available for 0dB, -16dB, -32dB and -48dB.
I am now cleaning up the display of the levels and inplemented an exponential averaging to get a more stable diplay (thanks to Mark Johnson). Then it is back to the manufacturer to update their quote due to PCB changes and a few extra components.
Stay tuned.
January 2017: I have submitted two complete auto-rangers to trusted persons for beta-testing. A also have produced a preliminary User Guide which can be downloaded here to get a feel of how the unit operates. It also has some pictures of the physiacl unit, but be aware that the final PCB layout may still change; for instance, some parts that show as SMD will be changed to Through Hole. But the overall setup is pretty well fixed.
Most of us use a soundcard and ARTA or similar software to test our amps and whatnot. But the soundcard has a 'sweet spot' at around 1V input level; go over that and the soundcard distortion goes up or it even can get damaged. So there is always a need for some rigged-up attenuator. irrtating! It also makes repeatability much more difficult, not to speak of varations in frequency response due to that makeshift attenuator.
So, what the Autoranger (AR) does is take the signal from the amp you want to measure, and size it to around 1V for your soundcard. Automagically.
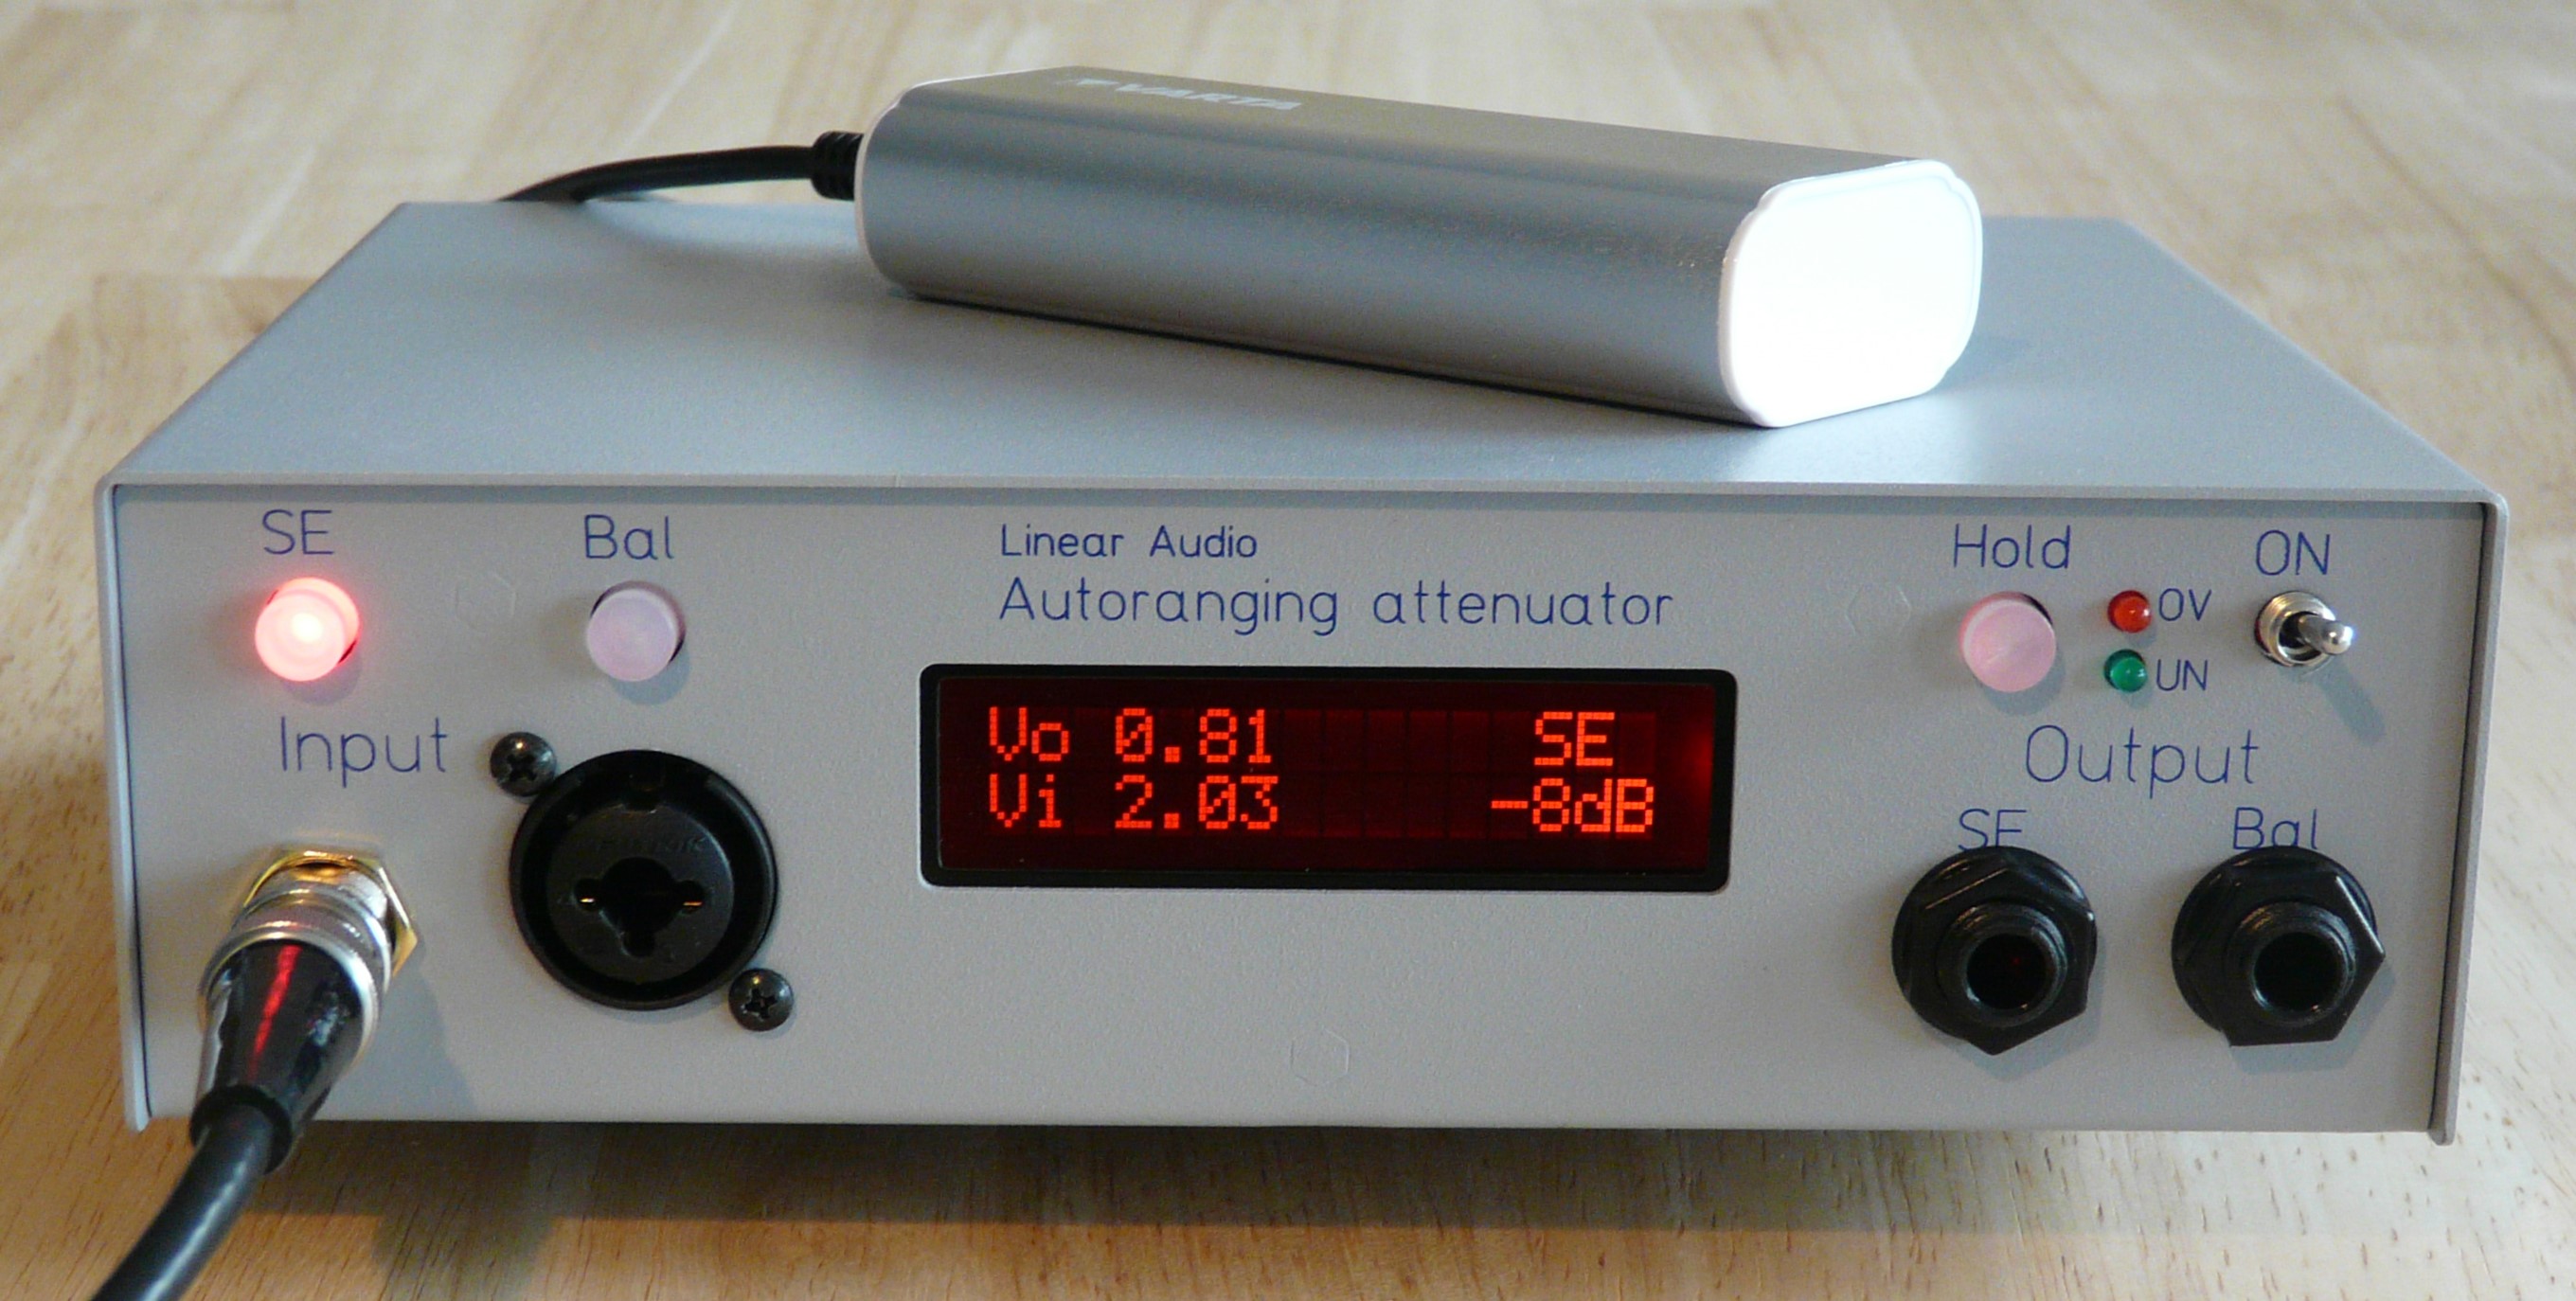
The AR is a separate small box (see pic) with a single-ended and balanced input that accepts the signal to be tested, and a single ended and balanced output to your soundcard. Simple and easy. But people don't like black boxes, so there's a small display that tells you what's going on: it shows the signal level going into the soundcard, it shows the signal level going into the AR, and the attenuation or gain that was applied to get these values. Then there's a pair of LEDs showing when the AR gets too large (more than 150VRM) or too small (less than 100mVRMS) an input to get it to 1V: the Overrange (red) and Underrange (green) indicators.
Although the AR runs fully automatic, you can manipulate it through a trio of pushbuttons. Firstly, there are two pusbuttons to select either the single ended or the balanced input. Internal processing is a bit different for the two modes so selection allows optimal results in either mode.
Secondly, if for instance you want to do some kind of level sweep, you can set the auto levelling at the highest level you expect and then press HOLD. This locks the attenuation or gain at the present setting until you release it with another press of HOLD.
Finally, one more manipulation: if you are in HOLD mode, the input select pushbuttons take on a new role: by pressing one or the other, you can force the AR into a flat -20dB or -40dB setting, or return to the initial locked setting. I have tried to think of all circumstances for use and this gives you additional options (it is also used for calibration by the way).
The AR accepts anything between 100V RMS (140V peak; yeah that's some amp you have there) and 150mV RMS. And as noted, puts it out levelled at around 1V RMS. The range goes from -40dB to +16dB in 4dB steps.
The frequecy response is flat within +/ 0.2dB out to 100kHz so it is flat even with a 196kHz soundcard.
Distorton is down to -120dB, also better than almost anything out there.
Input impedance is 100k in all attenuation and gain settings, within 1%. Input capacity is TBD but probably around 30pF in all settings.
I measured (adjusted) CMRR at better than 60dB out to 50kHz but will re-measure it because it is almost too good to be true...
Good that you asked! I have develoed the power supply with the notion that it should be totally separate from the mains. Too many of thee setups are plagued with hum, niose and line harmonics that somehow always seem to sneak in through the mains. The PSU for the AR runs on nominal 5VDC input. It can run on batteries from 3V to 10V, but the idea is to run it from a USB charger or a Power Bank (PB); it has a standard USB type B connector on the back). Of course, with a plug-in USB charger it is not strictly separated from the mains (although better than with a 'normal' power supply), but the PB option is ideal. You can dedicate a small PB to it and have it constantly on the charger, and for sensitive measurements (or for portabilty) you just unplug it from the charger. The power draw is small enough for many hours of operation even with a 2000mA PB*.
*That power supply is really a problem solver and you can also use it for anything that needs both a very low noise +/-15DC supply and a 6V, 5V or 3.3V 'digital' supply. I call it the SilentSwitcher.